Showing posts with label 25mm. Show all posts

Monday, August 31, 2020

August Projects

 During August I worked on completing the remaining 25mm Science Fiction items that had not been done.  These included assembling the buildings I got from PaperTerrain.  I also purchased some aliens as noted in the previous blog post and found a tank and an infantry carrier at Wargame Vault.  I needed different vehicles for the forces opposing the Federation.  

The vehicles are made by Tomoko's paper miniatures.  He also has 2d 28mm soldiers.  However, the vehicles are definitely not 28mm.  Fortunately I was able to use Paintshop Pro to enlarge them to 143% of their original size which made them compatible with my 25/28mm figures.  The PDF file has several different camo schemes.  All of them in shades of grey except for the one I chose to use.  The infantry carrier appears to be an M113 APC.  I haven't checked it against the actual vehicle to verify if it is an exact copy or not.   I added the original sized turret from the tank model to convert it into an IFV.  Instead of using the paper tube mounting system for the turrets I again went with thumbtacks glued to the inside of the turret with a strip of cardstock glued across the top of the thumbtack and to the turret floor to keep the thumbtack in place.  The only other modification was to cut the bottom of the track assembly as a wider straight edge instead of the jagged pattern making them easier to assemble.  The files include detailed assembly diagrams unlike the free ones that I made for the Federation.

The buildings from PaperTerrain were also PDF files and include detailed assembly instructions and diagrams.   The number of buttresses, bays, windows, and door openings can be customized as desired.  

The following photos show the buildings and vehicles.  The miniatures are from Grenadier Models, Inc.  They are the licensed Traveler Imperial Marines Imperial Marines.  They are being used as the Pantharii Impeium Marines.  I believe Magister Militum  has the molds, but has not recast them as of this time.   In addition to the marines I also bought a set of the adventurer figures back when they were released.  In addition to the sets of marines, I recently purchased some additional figures that were not part of a complete set that I found on Ebay.  |Fortunately no one else bid against me and I was able to get them for about $2 per figure.  Otherwise, there were a few complete boxed sets being offered at $120 to $160 per set.  I now have about three dozen of them for a complete platoon.

Again these will be used for Wiley Games Galactic Heroes and Bigger Battles.

The four IFV's, one of the tanks, and some of the Pantharii Imperium Marines.

Comparison of the Pantharii and Federation IFV's


Two of the PaperTerrain buildings.  The one on the left will be a bank.  The one on the right will be the town administration building.
The casino complex
Market building on the left and two others.

Saturday, March 30, 2019

Galactic Heroes at Conquest Sacramento part two

This part is description of the second scenario followed by a brief description of the action in the game.  The scenario is an expedition to examine an ancient abandoned alien site, gather as much data and items as possible and leave in the spaceship they arrived in.   The others are teams from various star nations or corporations attempting to capture the expeditions scientists and any data or devices that are at the site.   The scientists may not be shot at, but may be captured if defeated in close combat by a shaken, wound, or out of action result.   If captured they each must be accompanied by a team member and move at crawl speed.
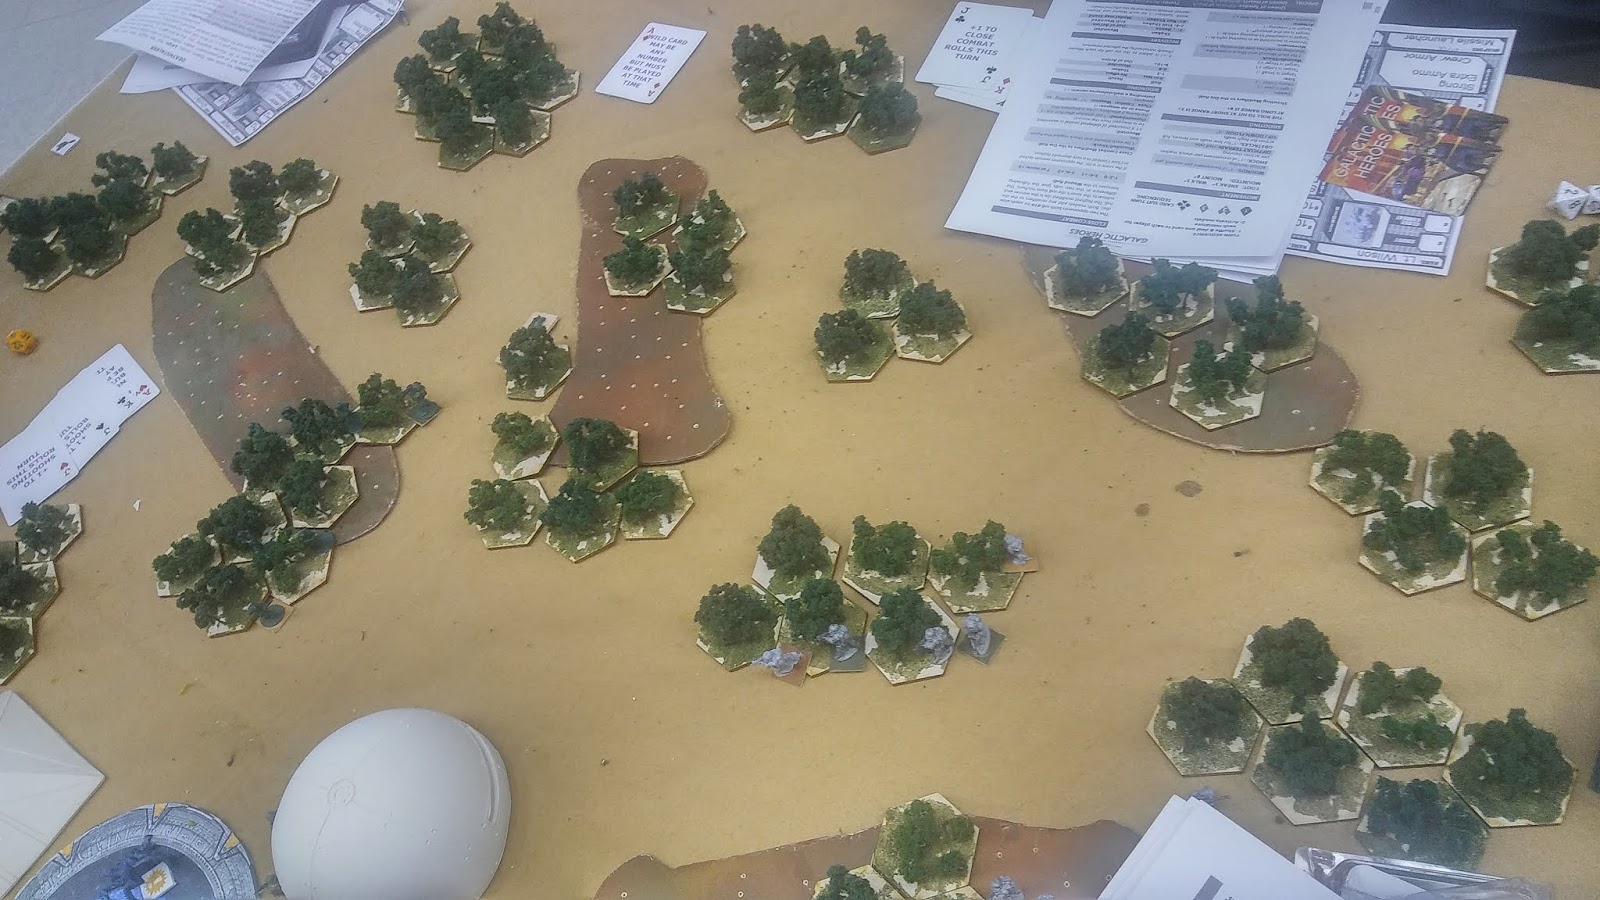
The scenario is designed for four to eight players and uses a six-foot round table or a five by six-foot rectangular table.   The spaceship starts at the center of one of the long edges of the rectangular table, any point on the edge of the round table.   The center of the metal disc is placed 40 inches in from the edge where the spaceship is located with the three buildings near the disc per the photos below.   The rest of the terrain is low hills and patches of wood that block sight and slow movement.

The teams are all from the supplement and have five members.   The spaceship crew uses the bounty hunter team minus the not-Jabba hero.  The spaceship crew will not leave the ship, but will defend it if it is attacked.  The two five-man guard teams for the expedition are the not-40K space marines.  One of the regular guards on one of the teams is replaced by three grunt scientists.   They have the following traits:  Smart, Slippery, and Lousy Shot and are armed with blaster pistols.   Combining Lousy Shot with the inaccuracy of the blaster pistol and the eight-sided die of a grunt results in the scientists not being able to shoot anything at long range and having a poor chance of hitting anything at short range.  The guards and the scientists start within the perimeter of the abandoned alien site.

For the round table locate the point on the edge directly across from the spaceship and place the starting point for the first two teams 15 inches from that location.   The next two teams start 30 inches from them and the last two teams are another 30 inches from the second pair of teams, placing them about 36 inches from the center of the spaceship.  On the rectangular table the first two teams will start six to twelve inches in from the corners of the opposite long edge.   The next two teams start in the middle of the two short sides.  And the last two teams start in the corners of the same edge as the spaceship. 

The six attacking teams cannot be the not-40K marines or the bounty hunters.  The first two teams are from the birdmen and ranger teams.   The last two must have armor reducing their movement to four inches be action. The other two teams can be any other team from the supplement.

In addition to the three buildings and the central disc there are two devices at the edge of the disc on the side facing the spaceship.   Each of the buildings can be searched for data and information.   On the first attempt if an easy task is passed then one data unit is retrieved.   For a medium task pass two units are retrieved and for a hard task pass three units are retrieved.   On the second attempt a medium task pass provides one unit of data and a hard task pass provides two units of data.   For the third and final attempt one unit of data is retrieved on a hard task pass.   Each unit of data is worth five points.  The two devices next to the disc are worth 50 points each and can only be removed by making a hard task pass.   Attempts can be made as many times as needed to remove them.   Once removed each must be carried by at least one team member at a crawl.   If two carry it then one inch is added to the movement rate per action.

The game started with four players and later two additional players who were passing by joined in.   The starting attackers were the birdmen equipped with jet packs, the rangers, and a regular team starting from the middle of the east edge.   The spaceship was on the south edge of the table.   The later arriving players took the two armored teams.

While the scientists were inside the buildings attempting to retrieve as much data as possible the two team leaders were trying to remove the two devices.  One of them removed a device on the first turn and the other accomplished removing the second device on turn two.  While this was happening the raiders were advancing and starting to engage the guards.  At the end of the second turn a strange humming could be heard from the disc and suddenly a group of four demonic looking creatures appeared.

Both jokers had been included in the deck as wild cards.   If  a joker was played and there were any creatures on the table they would move in a random direction determined by an arrow die or the top corner of the result of a ten sided die roll.  This movement would take place after all cards of the type that had been called had been played.   Thus if tens were called and the first joker was played as a ten once all players had finished playing their ten cards the creatures would then move.   If the second joker was played in a turn then additional creatures would appear.   The number of creatures appearing would be determined by the difference of two averaging dice, marked 2,3,3,4,4,5 or if both were the same that number of creatures would arrive.   For a regular six-sided die count one as three and six as four.

The creatures had the following characteristics:  Close combat D10 +1, Wounds 2, Wound roll +2, Move 4 per action and +3 inches per turn.  No shaken/shock effects, Leap +2 inches, no terrain penalty for movement, +1 to break down door,
To be hit shooting +1, to be hit in combat -1, to be wounded – 1, no penalty for fighting more than one opponent or not having a close combat weapon.
When the creatures were activated on the third turn two of them charged the round domes and the other two headed off to the east attacking the guards that were there.   One of the scientists was engaged by a creature after it broke down the door immediately.  He was lucky and only suffered a shaken result.   On his turn he slipped from its clutches and ran for the spaceship.  The creature was then knocked out of action by the guard in the dome.   The other guards did not fair as well.   During the course of the game one of the creatures killed two of the guards and spent a couple of turns devouring the remains of the second guard (no jokers played during those turns).  The other scientist also packed up their gear and made a run for the ship before they could be caught by any other additional creatures.  Surprisingly the scientists did not stop to relieve the team leaders of the devices as they ran for the ship.
One of the armored teams made an alliance with the birdmen who had moved to the southwest of the site.  Together they formed a firing line that kept the two guard leaders pinned down with shaken and wound results.  While they put up a tough fight the guards kept suffering casualties as additional creatures arrived.    They were eventually down to only three of the starting nine and only one made his escape to the ship abandoning the devices.   The two teams of raiders who had partnered split the devices between them.

The rangers had made it to the site and finished investigating the buildings finding a few more data units.   Except for the one creature munching on the guard all the others had been killed.  The team advancing from the east met that creature just after it finished devouring the guard  with only one team member surviving its attack by running away.   The creature then went on to attack the other arriving armored team and was finally slain. 

Final results for the game were 50 points each for the two teams with the devices,   35 for data retrieved by the expeditions scientists and 25 points for the data retrieved by the rangers.    
  End of the second turn.  Four creatures have appeared on the portal.   The guard with one of the scientists on top of the dome is actually inside.   He managed to kill two of the creatures during the first round of combat with each of them.
 One of the guards engaging the birdmen in close combat.
The two team leaders dragging the devices towards the spaceship at the bottom of the picture.  

The first part is here

Friday, March 29, 2019

Fistful of Lead: Galactic Heroes at Conquest Sacramento

The Weekend of March 22-24 was the Conquest Sacramento convention.   There were two games of Fistful of Lead:  Galactic Heroes on Saturday.   The first was the smuggler scenario from the rule book.

The rival groups were all taken from the compendium supplement.   The smugglers were the Kreng who had to deliver the contraband to the Ornks.   The Rebels were out to intercept it for their own use and the local law enforcement, Imperial Storm troopers, were out to stop everyone.  The game was played on a 4x6 foot table.

almost as soon as they got outside the port facilities the Kreng became engaged in a firefight with the rebels.   One of the Kreng climbed to the top of the second story of a space port building to get better shots at the rebels.   As the Kreng werr getting the better of the firefight, one rebel climbed to the top of the first story of the port building.   Seeing this the Kreng warrior on the second floor jumped down on him and proceeded to slice and dice the unfortunate rebel.

Meanwhile the police had advanced along the south edge of the town heading towards the spaceport and the Ornks were moving towards the center of town.   The two groups also became engaged in a long range firefight, but with little effect.   About this point the person who had signed up for the game finally arrived and took over from my friend who had volunteered to take his place until he arrived.   From this point the police became very passive hiding behind the buildings and trees in the south part of the town.

While some of the Ornks were trading shots with the police, the others were headed towards the town plaza to try and make contact with the Kreng.   The came across a couple of the rebels and engaged them with one of the Ornks killing both.   At this point the two wounded rebels who were still alive decided to retreat after loss of their leader and his second in command.

With the rebels retreating and the police in hiding, the Kreng were able to make contact with the Ornks next to the tavern and turn over the contraband.
The East Moss Landing spaceport.  the Kreng have just left their ship with the green box of contraband that they were paid to deliver to the Ornks.  
The local law enforcement arrives in the southeast corner.
The Ornks starting from the northeast corner.
The rebels in the northwest corner by the container yard.
The port of East Moss Landing viewed from the west.

The Ornks move into town.
The police advance in line abreast
Firefight between the Kreng and rebels.   One Kreng has climbed to the top of the first floor
The police take cover as they trade shots with the Ornks in the background.
Rebels hiding behind a taxi
The lead Ornk near the central plaza.  The tavern is in the lower center of the photo with a can of the local beverage next to it๐Ÿ˜
Unfortunate rebel about to be sliced into small bits by the Kreng who jumped down on him.
Another view of the police hiding amongst the trees as an Ornk advances to the small wall.
An Ornk rushes one of the police hoping to take him out.
Another Ornk slays a rebel near the plaza
The second part is here

Saturday, February 9, 2019

Droid! Droid! Who's got the Droid?

Played another game of FFoL: Galactic Heroes at The Launchpad Game day February 9th.  This was the scenario from the rule book where the rebels have one droid with half the plans for the Death Star.  The other half is with one of the four droids roaming around the town.   The rebel pair of two five man teams starts in one corner and must make it to the starship at the port in the opposite corner.  The Imperials have two five man teams.  One in each of the other four corners with the mission of stopping the rebels and capturing the tow droids with the plans.  The rebel objective was to get both droids to the waiting spaceship at the port.   The imperials was to prevent this and capture both droids.

My plan was to send the majority of my teams to my right  and angle towards the spaceport.   A small covering force would try to pin down the imperial team coming from the left corner.   Gary commanded the two imperial teams.   Gary was able to get to all four droids before I could.   He found the other half of the plans with the third droid he reached near the fuel depot and crawler.

While my delaying team was able to hold off four of the imperial troopers from the team they were facing.  My main force was held up engaging the other team in a firefight.   The fifth member other team had worked his way around behind the tavern to get to the fourth droid, keeping him out of action.-

Gary had back luck with most of his shooting die rolls, getting out of ammo at least three times during the game.   My shooting die rolls were a bit better.   Eventually my two guys engaging the left imperial team took out two of them and the other two headed towards the spaceport.

On the right I was eventually able to prevail taking out two of the right hand imperial team and the fifth one from the left who had moved up to the port along the main street in hand-to-hand combat.   Another two imperial troopers were also shot down leaving Gary with only three men left to try and prevent my remaining eight guys from getting to the ship with the two droids.   I had managed to shoot the imperial soldier who had captured the other droid and had two of my men move to it and take control.  

In all it was a fun game that took a little over two hours to play.  I took a few pictures at the start of the game.   There was so much happening during the game that I forgot to take more.

 view from my starting corner.   about half of my guys have moved.   the droid I started with is the white object just below the lab with the cards on top of it.   The tavern is just above the lab.   The playing area was three by four feet.   I started by sending one team leader and two of the regulars towards the left team. and initially positioned the heavy weapons specialist near the fence by the lab to support them.   On turn three I moved the leader to the right hand group along with the specialist.  One of the wandering droids is the grey object just above the building to the left of the lab.   Another was at the back corner of the tavern.   A third was at the spaceport near the landing pad and buildings.   The fourth, which turned out to have the other half of the Death Star plans, was wandering along the main street near the crawler and the fuel depot.
 The container yard with the other imperial team moving towards the port.  towards the end of the game I took out this team leader with a to hit roll of nine and followed that with a to wound roll of nine.  The crawler and the fuel depot are out of the picture at the bottom left.
The waiting spaceship at the port.   This was a two deck plan that I printed and glued to artist mat board.  

More pictures of the spaceport buildings can be seen at East Mosley spaceport


Thursday, February 7, 2019

East Mosley Spaceport

My last project for January was to assemble a batch of buildings to use with Galactic heroes.   The buildings are from two different suppliers.  The blue buildings are available on WargamesVault and are the blue Babylon set.   The set is also available in red, yellow, and green.  I used them for the spaceport offices because they could be printed with signs like security, administration, and habitat.  The set also included a transmitter tower.

The other buildings are from the Mars Station set made by WorldWorks Games  They make western, medieval, and other sets in addition to scifi.  The building components can be assembled in different sizes ranging from 2 inch by two inch up to 7 inch by 7 inch or even larger if desired.   They can also be single or multi story.   I am going to be adding some additional buildings from this set.   The set also includes barriers, some interior items and various other props, along with cargo robots and a crawler.   It also includes a spaceship landing pad.

 Spaceport buildings on left, cargo containers on right.  Transmitter at lower center
 Taxi at lower left.   Crawler at lower right.   Large two story building on right is the lab.   One in the center is the tavern.   Fueling station to left of tavern.   
 Other shops and residences 
Another view of the spaceport facilities.

The buildings from both sets are in PDF form and as many buildings as desired can be printed.

Saturday, February 2, 2019

The Epedition, A Game of Fistful of Lead: Galactic Heroes.

I ran a game of Galactic Heroes at the South Bay Game Club's February meeting.   The scenario was a scientific expedition was investigating a mysterious abandoned alien site.   Word had come that teams from other star nations had been dispatched to capture the scientists and the site.   The scientist had to gather as much data as possible plus any artifacts and make it back to their ship.  There were four teams of varying strength and capabilities arriving from different directions with the objective of capturing the scientists and data and preventing the others from doing so.

Greg had the expedition and on the first turn he was able to remove the device next to the large circular metal platform using two of the scientists while the third was inside one of the buildings gathering equipment and data.   Meanwhile Scott, Curtis, Manny, and Frank were advancing as quickly as they could.

Removal of the device next to the platform was to have am unexpected consequence.   At the end of the second turn the platform energized and eight strange creatures appeared in the middle of it.  Greg was already moving the device towards the ship, moving at a crawl.

I had included the jokers as additional wild cards for the game.  If one or both of them were played the creatures would move after all cards of that type had been played.  That is, if a joker was played as a king, then once everyone had finished with their kings the creatures would then move and attack anyone in sight.

During the first two turns Greg had moved some of his men to positions to try and cover the directions that the other teams were coming from.  On the third turn his third scientist bolted from the building carrying the data he had gathered and ran for the ship.   Two of the creatures went chasing after the scientists and caught them while others attacked the buildings and a couple of guards that were nearby.   Surprisingly the creatures were only able to stun the scientists while another was immediately dispatched by the guard that it attacked.   Manny opened up with his missile launcher firing at the group of creatures that were attacking the buildings.   Both shots were accurate stunning and wounding four of them and killing a fifth.  Two more creatures arrived at the end of the third turn.

Greg had also been trading fire with Curtis and Manny's teams While Scott and Frank continued to advance towards the ship.   Greg moved the guard team leaders to help fight the creatures attacking the scientists.

The fourth turn saw more action everywhere.   Greg was able to eliminate the creature attacking the scientists with the device and stunned the other one attacking the third scientist.  The two with the device headed towards the ship while Scott and Frank   The two scientist were almost to the ship and both Scott and Frank had men in position to possibly intercept them.    It was not to be though as the two scientists were able to board the ship before they were caught.   The third one had recovered and was desperately trying to get to the ship when Frank's man attacked and knocked him out.

Rumbling noises were heard from the ship as the engines were being warmed up.   Frank fired a missile at the ship attempting to disable it, but the missile bounced off and landed on his man and the scientist.   The explosion took out both of them.

Curtis had blown a hole in the side of one of the buildings sending a pair of men inside to see if they could find anything, but it was empty.   Manny landed another pair of missiles on the eight creatures that had arrived the explosions left five of them wounded and/or stunned and killed two.   The last one went after one of Greg's men who turned out to be the one who had already slain two of them.   He added a third kill.

The game ended as the ship took off with the surviving scientists .leaving the remaining guards behind.  Manny's team had gained entry to the other round building finding a large batch of data that had been left, while Curtis entered the pyramid and found some also.

At the end of the game five out of nine of Greg's guards had been lost.   Both Curtis and Frank had lost a couple of men.   Both Manny's and Scotts forces were intact.   Greg placed first, having escaped with the device, Manny was second with the most data collected. and Curtis was third.

Scott started the game with twelve men including a leader two specialists and nine regulars.  All of them armored with laser rifles  Manny had seven with two of them being the missile team along with a leader and a specialist.   Curtis and Frank had a leader, a specialists with a heavy weapon, a regular and six grunts.  Curtis had Jump packs and Frank had armor.  Greg had two team leaders, a specialist and six regulars along with the three man science team (grunts)   The table was six by five with low hills and scattered woods.  

I was so involved with the game that I only took a few pictures.   These are from after the third turn of the game.
 The alien site with the platform activated.
 Scotts force in two groups at the left (Strike Team 13.  Mannys at the top center
 Curtis' team at the left center in the woods.  Difficult to see due to matching combat suits.    Franks are at the center of the picture.   
Greg is still trying to rescue the third scientist at the center of the picture.  Frank's team is at the center right, Scotts is at the lower left.  Curtis is at the top center.   Manny is at left edge of picture.

Saturday, January 12, 2019

Gladitaorial Combat.

Sorry, but no pictures.   I got to participate in a Gladiatorial contest today at the South Bay Game Club.   Scott was running the game and Andy, Charles, Dave and I were the owners of the gladiators.

Dave bought an exceptional gladiator and the rest of us bought average ones.   Dave got to roll four 3-sided dice for attribute points and the  rest of us rolled three.   Dave scored 9 with no additional modifiers and I scored 8 with a modifier of plus 1.  Charles and Andy scored less.

The first round had us paired off in individual combats.   I faced Charles and Dave faced Andy.  My first move was a cautious walk forward and to my left.   Dave charged his opponent, scored a fumble and found out his sword was defective.  Andy then struck back and also fumbled dropping his net and trident.   Eventually, Andy was able  to overcome Dave's Samnite.  Charles charged me and after a couple of rounds I defeated him seriously wounding one of his legs and giving him the nickname "Stumpy".   I also had a Samnite and Charles had a gladiator with two swords.

Andy was the victor of that round, while I placed second.  Andy, Dave, and I all earned experience points which we were able to use to attempt to increase our abilities.   I was fortunate with my die rolls raising my size to the maximum of 6 and also adding to two other traits.   The size increase was to play a major part in the following rounds.

The second round had Dave and I paired against Andy and Charles.  Again, I made a cautious move forward and left and Dave advanced forward also,  Andy advanced and attempted to net Dave's Gladiator, but ended up seeing Dave deflect the net causing it to land five spaces to the right rear of Andy's fighter due to a fumble roll by Andy.   While Andy went to retrieve his net, Charles advanced.  I charged Charles and dispatched his Gladiator with a mighty blow to his neck.  A D6 roll of 6 plus my strength of 6 saw his head severed from his body and flying across the arena.   If a hit is scored, how much damage that is done by a sword is determined by a D6 die roll plus the character's strength less any armor protection.  Dave then charged Andy causing some damage and I followed up with a charge of my own knocking Andy's Gladiator down. ending the second round. I placed first and Dave placed second.   I earned an additional five experience points  which I used to increase my sword, shield, and grappling abilities.

The final round was every man for himself.   The first turn, I again moved forward and to my left heading towards Dave's man.   Charles was to my right and Andy was at the opposite corner.   Dave charged Andy for little effect,   Charles came to Andy's aid and attacked Dave from the right flank injuring Dave's right arm and causing Dave to drop his sword.  Dave was netted by Andy and was badly wounded and out of action by the time Charles and Andy were done with him.   While they were fighting Dave and Charles both rolled fumbles.  Dave tripped over his own feet, while Charles was hung over from the night before halving his attributes for the remainder of the contest.  Meanwhile, I continued to walk towards Charles.  We engaged in a brief exchange ending the turn with minor damage to Charles guy and no effect on mine.   I did deliver a blow to his head that was deflected by his helmet.  Andy had advanced, but was not able to make an attack.

 I received an extra card for the second turn.   Anyone being dealt an ace got an extra card for their hand.  Aces are wild cards and may be played as any card during a turn.  Cards are played from King down to two.  Others got an extra card during the first two rounds.  I used my first card to move and attack Andy's gladiator.  He attempted to block my attack with his net and my sword left it in shreds and wounded his left leg.   He lunged at me with his trident piercing my shield and wounding my left arm. I followed this with another attack, but he blocked with his trident causing some damage to my sword, but fortunately not breaking it.   I blocked his next stab with my shield receiving no damage.   I attacked him again with my third card cutting through his right leg and putting him out of action.   For my final card I moved back to Charles cutting through his left leg, causing him to collapse. and ending the combat.  When a hit is scored a D10 is rolled to determine the part of the body hit.  For some reason most of my winning attacks during the contest were leg wounds.  Three of my opponents ended up missing part of a leg.

Scott said that the contest had the most fumble rolls that he had ever seen in any contest.   When fighting both players roll a D10.   A roll of a natural 1 is a fumble causing the player to roll on the fumble table with a  D20.

Wednesday, January 9, 2019

Dunkelgelb Imperial Marines Strike Team 13


The highly decorated Strike Team 13 of the Imperial Space Marines.   Decided to name them for characters in a TV series.   These are the old Grenadier Traveler Imperial Marines with an extra figure from the Grenadier Traveler Adventurers set.   These are for use with Fistful of Lead Galactic Heroes.    There is one leader with three traits in addition to the trait for the entire crew, two specialists, with two traits, and nine regulars with one trait each.

The team is oversized and would normally count as two teams (crews) in the game.   I might change Pvt. Burkhalter to either impervious or steady as a rock.  Other forces posted at https://18clovehamhock.blogspot.com/2019/01/fistful-of-leadgalactic-heroes.html


Tuesday, January 8, 2019

Fistful of Lead:Galactic Heroes

After seeing some games of Fistful of Lead: Galactic Heroes at the club I purchased a copy of the rules and went looking for my old 25mm scifi figures.   Note these are actual 25mm figures from the 80s.   I found the box I was looking for and another box that I forgot I had.   The one that I forgot about had a bunch of Star Guard figures from McKewn miniatures (now carried by the tin soldier company.  The ones I was looking for were a mix of Grenadier Traveler Imperial Marines and others.
Grenadier had made four boxed sets of Traveler miniatures.  The marines, adventurers, aliens, and creatures.   I still had the two sets of marines and the adventurers that I had purchased.   I had passed on the other two sets.   Checking eBay I found a few listings for the marines and one for the adventurers.   All for $130US or more.   However, I did find one listing for a partial set of marines starting at $5US.   Two if the figures were missing.  I kept a watch on it and on the final day noticed that there were four others watching and one of them had bid $5.   Expecting a major bidding war, I set of a bid  and held off on bidding until the last minute.   Much to my surprise I got them for $9.  Taking into account inflation, I think I got them for the equivalent of about one-fourth of the original price.

I am waiting for them to arrive and spent yesterday painting the figures that were not finished.  In my previous post on 2019 projects I thought I had about a dozen figures to paint.   It turned out to be about twice that plus some additional touchups.   Other than the new imperial marine figures this project has now been completed.  Below are photos of the various figures, not including the Starguard figures or the adventurers.   One of the figures I found was John Carter of Mars with a radium rifle slung across his back.   I have no idea what company made him.    I'll have to join the Lead Adventure Forum and see if anyone there knows who made him. At the bottom are the rosters for the Waldheim team..
 Starship crew
 science team
 Federation team guarding scientists.
 Greenwood Marines
 Graustadt Stormtroopers
 Kama infantry
Dunkelgelb Imperial Marines
The roster is used to list the figures name, special traits, a common trait for all the team members, and weapon(s) carried.   It also shows the type of die to be rolled for shooting and close combat.   There is a space at the top right for a picture of the figure which I added by photographing the figures and then reducing the photo to fit.