Thursday, December 13, 2018

Alexander the Great and His Friends "See the Elephant" at Hydaspes

Ran the Battle of Hydaspes at the South Bay Game Club December meeting.   The game did not quite go according to history as the Macedonians were more cautious and the Indians were much more aggressive than they were historically.   Alexander had three pike taxis, the Hypaspists, the Companion cavalry, horse archers, light horse and Agrianians.   The Indians had 120 elephants, 30,000 infantry (some with the elephants), 4,000 horse, and 200 chariots deployed in a symmetrical formation with the infantry ten ranks deep.

Alexander determined who went first each turn.   The Macedonian army's deployment was close to historical with  the majority of the army deployed across from the left end of the Indian army and some cavalry across from the other end.

The Indians opened the action with a general advance by the entire army.  Alexander countered by withdrawing the cavalry from his left back towards the main body of the army.   Eventually the elephants made contact with the Hypaspists and the phalanx.  Alexander's right flank cavalry engaged the chariots and Indian cavalry opposite him after the horse archers had damaged a few units.   The Indian right flank eventually caught up with the withdrawing Macedonian left flank and only with a desperate struggle were the light horse on that flank able to hold as the Indian elephants poured through a gap in the Macedonian line on that flank.

The battle ended with the Companions crushing the opposing chariots and Indian horse though at a cost, while the pikes drove the elephants off and the Agrianians were able to save the left flank by attacking the lead elephant unit from the front and flank chasing it back into the rest of the column.

The game was declared a Macedonian victory as most of the elephants were panicking, the Indian left flank had been destroyed and the main infantry body was starting to crumble with several units of infantry already routing.   The cavalry engagement on the opposite flank was still in doubt, but the penetration of the line by the elephants had been halted.   There was a good possibility that the light horse on the Macedonian left would have broken, but by that time most of the Indian infantry would have also been running.   The game took about an hour and a half to two hours to play.

Macedonian losses were about 50 companion cavalry, 50 phalangtites and hypaspists, and some of the light horse. and agrianians.    Indian losses at the time the game was called over 2000 cavalry, 100+ chariots, over 6000 infantry and about half the elephants panicking.
 Macedonian right wing
 Macedonian left wing

 Turn one.  The Indian army advances with the elephants in front.

 Turn two.  The battle lines approach each other

 The Indian commanders.  Manny in front as one of Porus' sons and Bob as Porus.

 Greg as Alexander, recording the battle.   Planes on sticks monthly game in back.

 Macedonian cavalry roughly handling the Indian left flank.  One unit of companions chasing routing Indian horse at the bottom center.

 Companions work their way through the Indian chariots and cavalry.  Alexander is with his bodyguard just to the upper left of center.

 Indian elephant conga line penetrates into the rear of the Macedonian army.  Outnumbered Asiatic light horse engages Indian cavalry at lower left.  Phalanx units and Hypaspists fighting elephants center and right as Indian infantry looks on.

 Elephant line starts to crumble as Hypaspists drive off the elephants fighting them.

Indian left flank has collapsed.  Mxss of routers lower right.  Elephants are running in all different directions and would eventually cause part of the Indian infantry to also run on the following turn..   Towards the upper center the Agrianians have attacked the lead elephant unit in the conga line from the front and flank causing it to turn and run into the next unit in the line.  One companion cavalry unit would end up in the rear of the Indian army.    Alexander is just to the lower left of center.   Though his bodyguard unit to a couple of casualties he was unharmed.   At least one sub-ordinate general on each side lost their life.


Sunday, November 25, 2018

A game of Blucher at the MWS november meeting

Played a game of Blucher today at the MWS meeting.   Hal was the game master, Dave had the Austrians, and I commanded the French.

The Austrian army had two infantry corps of 6 infantry brigades and two artillery brigades and a Reserve corps of two grenadier brigades, two cuirassier brigades and two light cavalry brigades.   Their objective was to defend their position and the two objectives of the village in their left rear and the hill in their center.

The French had three infantry corps of four infantry brigades, a light cavalry brigade, and an artillery brigade.  They also had a cavalry corps of two cuirassier brigades, two dragoon brigades, a light cavalry brigade, and a horse artillery brigade.  Their objective was to defeat the Austrians and capture the objectives.

Dave placed his two infantry corps on the left and center and the reserve corps on their right.    I spread two of my infantry corps in a line on my right and center, kept the other infantry corps in a tighter formation on my left, and placed the cavalry corps in reserve behind the junction of the left and center infantry corps.   My plan was to attack Dave's right flank and roll his army up.

Blucher uses a dice activation system where three dice are rolled.   The resulting number is how many units can be moved.   With a maximum of eighteen and an average of ten/eleven, the French were normally going to be able to activate two corps per turn with a maximum of three.  You can activate an entire corps if the units are close enough to each other,  followed by individual units, and then finally using the overall commander to activate any units within two base widths of the commander.   Once the number of units activated equals or exceeds the dice total that player can no longer activate any further units.  Except for cavalry which cannot fire and horse artillery which may move and fire, units can either move or fire.   Infantry units that do not move may adopt a "prepared formation, which gives them a melee advantage against cavalry, but makes them more vulnerable to fire.

I moved first each turn.   For my first turn I was able to activate the two right flank infantry corps which advanced towards the Austrians.   I made a mistake by moving the artillery forward instead of firing with them.    Dave's turn saw his two infantry corps being activated and all four artillery brigades firing on my middle infantry corps artillery driving it from the field.   For the rest of the game, when I was able to activate it the right flank artillery kept up a steady fire on one of the infantry brigades in Dave's left flank corps, knocking it down to one remaining fatigue point.   Artillery has a limited ammunition supply and the number of firing dice is reduced as it continues to fire.   I was down to my right corps artillery last fire when Dave was able to activate his left flank corps and pull the damaged infantry brigade back and place another in the line of fire.

While the right flank was firing, I moved my left infantry corps forward and began firing its artillery. My center infantry corps would remain inactive for most of the game until the final few turns.  My left corps continued its advance and the cavalry corps moved forward also with the two dragoon brigades  and artillery leading.  Dave countered by charging his two cuirassier brigades at my dragoons.   The rules have a requirement that charges must be made against an enemy unit that is closest and able to attack the charging unit.   Even though Dave's cuirassiers had more combat dice than my dragoons my die rolls were better and his cuirassiers were repulsed.

Diagram of the battle

I followed this with fire from my horse guns and charges by my dragoons into his cuirassiers, destroying one of them and inflicting more damage on the other. The cavalry action was to continue as Dave added his light horse to the cavalry melee.  Unfortunately for them they charged into my cuirassiers and were forced back.  By the time the cavalry melee ended, all four of Dave's cavalry brigades had been destroyed.  My cuirassiers had advanced beyond the hill and were now threatening to turn his right flank while the rest of the cavalry corps remained near the center.   His grenadiers moved to protect the flank and his center corps started to shift units to help the right while the forward infantry assumed prepared formations.  Before it was destroyed his last cavalry brigade was able to eliminate one of my dragoon brigades which had been weakened by artillery fire.

As my cuirassiers maneuvered to extend his line, my left flank infantry corps advanced on the two grenadier brigades. and eventually drove them off the hill on Dave's right.   The final few turns of the game saw my center corps advance and threaten his weakened center along with the destruction of one of the grenadier brigades and an Austrian line infantry brigade on my final turn.

The game ended with the Austrians losing four cavalry brigades and two infantry brigades for a total of six units which was their break point and the French losing three units.   Break points are determined by totaling the number of infantry and cavalry units, dividing by three and rounding up.    This gave the Austrians a break point of six and the French a break point of seven.   While artillery units are not included for determining the break point any artillery unit that is lost does count towards it.  I had lost two of my artillery units in addition to the unit of dragoons.

Thanks to Hal for putting the game together.  I did not take any pictures of the game as we were using top down cards for the units.  While I did enjoy playing the game, the activation system makes it difficult for a coordinated attack with multiple corps.   Armies with large corps like the Prussians at Ligney will find it difficult to activate more than one corps per turn unless it is a multi-player game with each player commanding only one corps.

Update: added a couple of photos taken of the game by Mike O'Brien.  French are blue and Austrians are yellow.   These were taken after the Austrian cuirassiers had been destroyed (cards in left rear of photo) and just prior to their light cavalry (two brigades at bottom of the picture) engaging the French cuirassiers.   The French left wing infantry corps is at the bottom with their cavalry brigade at the very bottom of the picture.  The cavalry corps is just above and in front of them.  Austrian grenadiers are on and at the small hill at the bottom center of the picture.   The French cuirassiers would eventually end up just above the forest at the bottom left and their infantry corps would be occupying the hill.   Two Austrian infantry brigades are headed towards their right flank (cards turned 90 degrees near the center.  French artillery brigade that had been driven off is at the right edge of the table next to the drink cup.


Tuesday, October 30, 2018

CEase Fire Declared

A cease fire has been declared in the conflict between the Federal Union of Buena Vista and The Peoples\ Democratic Republic of La Cucaracha.  Both nations have been at war with each other for decades.   The current fighting began with an Invasion of Buena Vista at the Battle of Montana Libre

After La Cucaracha managed a narrow victory, Buena Vista counter-attacked at the Battle of Princepe de La Paz  where Buena Vista was able to accomplish a significant victory

Buena Vista followed up its victory by advancing further into PDRLC territory and was met by opposing forces at the Battle of Carmichael   Once again Buena Vista was victorious and continued its advance.  

The forces of both sides met again at the Battle of Santa Clara  Neither side was able to claim victory for this engagement.
   
The next engagement was the Battle of Marconi   The PDRLC was again defeated and Buena Vista continued to press the advantage it had gained.   

At the Battle of Ciudad Tiempo Pasado the PDRLC army put up a better defense and though it had lost the battle it was by the narrowest of margins., Enough damage had been caused to slow the Buena Vista advance.

The final battle was fought near the city of Saratoga.  Here La Cucaracha was able to defeat the Buena Vista forces and force them to fall back.   Unfortunately this records for this battle were lost during the Buena Vista retreat.   At this point both sides were exhausted and agreed to a cease fire with Buena Vista having made some territorial gains.

While both countries have naval forces these consist of surplus frigates and submarines and are separated by the Panama Canal.   The Republic of Dalmatia had sent a task force to aid Buena Vista, but was not able to engage the PDRLC navy before hostilities ceased.


Tuesday, October 23, 2018

Return to Cold War Commander/Blitzkrrieg Commander

Tor the past few months we have been playtesting Fistful of Tows 3 to see how it played.   We had been looking for a faster playing replacement for CWC/BKC.  While FFT3 has some good ideas and a lot of additional data the indirect and direct fire mechanisms do not provide faster play than CWC?BKC.  

The procedure for indirect fire in FF3 is to dice for the number of rounds available, determine if on target. roll for deviation if not, roll on snafu table if called for on deviation table, compare number of fire missions to gun caliber to determine attack number, roll on attack number table to determine effect for each target in burst area, targets roll for morale if called for..  

For CWC/BKC the procedure is to roll for command to get the fire or not, determine if on target or not, roll deviation if off target.  roll for damage to all targets in burst area, targets roll for morale if needed.

For direct fire FFT3 has the following procedure:  roll number of dice for rate of fire, may engage more than one target if desired,  make any terrain saving throws for hits,  compare penetration to target armor to determine number of penetration dice per hit (if penetration rating is 3 less than target armor there is no effect),  roll number of dice indicated, killing on any die with a 6 or making a morale check if no kill and any die is a 4 or 5.  At effective range a 4 or higher is needed, at longer range it is 5+ and at close range it is 3+

The procedure for CWC/BKC is to roll the number of dice indicated hitting on a 4 or better in the open, 5+ for light cover, 6+ for heavy cover.   The target rolls for saving throws for any hits based on their save number,  if enough hits are scored the target is knocked out otherwise it tests to see if it is suppressed or may have to take a morale test if it is already suppressed based on the number of hits it received.

As can be seen that while the processes for both the indirect and direct fire are similar and tend to obtain similar results, those for CWC/BKC are less complicated than those for FFT3.  The main difference is that vehicles with weapons that might not penetrate the armor of heavier vehicles might be able to cause a kill if enough of them score hits on a target in CWC/BKC.   The usual result is most likely to be suppression.

BKC is currently being updated at Pendraken Models and CWC will be updated later.   Since CWC was published there have been quite a few changes.   A lot more information is available and known about both Warsaw Pact and other armored vehicles.   Ammunition, armor, targeting and other systems have improved.   New vehicles have been put into service and older ones have been updated.   A while back I compared the armor values for tanks in CWC to more recent data that was used for the modern version of Command Decision on my post at Cold War Commander Hits and Saves  The same source was also used to determine the armor ratings in FFT3 and the numbers are comparable.

I have begun a more thorough process of updating vehicle hit/save numbers for CWC.   Due to the limitation of the hit save matrix used for CWC some values have to be adjusted to the closest value in the hit/save table.   Wherever possible at least three hits will be the minimum for armored vehicles and five hits will be the maximum.   The latest tanks with a high enough armor rating like the Challenger2, Leopard 2A5/6, and M1A2 will be 6 hits and a save of 3  instead of 3 hits with a save of 2.  I do not expect any future vehicles to obtain a high enough armor rating at this time to warrant a better hit/save value.  Though if they did it would be 4 hits with a save of 2.

The Russian tanks tend to have the most variants and changes.   In the previous post I noted that Command Decision had twelve different variants of the T72.  FFT3 has eleven primary variants designated by letter and number suffixes and multiple versions of those variants depending on type of missiles carried and date of service (improvements in anti-tank round penetration and/or armor).  Other Russian tanks also have multiple variants and versions of those variants.

Sunday, October 21, 2018

WW2 using Fistful of Tows 3

The game took place at the Miniature Wargaming Society of Sacramento meeting on Sunday October 21st.   The scenario was set in late 1943 on the Eastern Front.   The Russians had broken through the main German line and were advancing towards the west.   The Germans had assembled a kampfgruppe with orders to stop the Russian advance and if possible drive it back.   

The Russians had two T34/76 battalions of six platoons each, a T34/85 battalion of nine platoons, and an Infantry battalion of four submachinegun platoons, two heavy machinegun platoons, an 81 mortar platoon, and two anti-tank rifle squads.   Keith commanded the southern force with one T34/76 battalion and most of the infantry battalion.  Hal had the other two battalions on the northern part of the battle.  The Russians were rated as fair.

The Germans had two PZIVH companies of three platoons, an STUGIII company of three platoons, a Tiger I company of two platoons,, an infantry company of two infantry platoons and an STUGIII platoon, two STKFZ222 armored car platoons, and two 82mm mortar batteries.  Chris commanded the northern force of one PZIV company, the infantry and the mortars.  Mike had the rest of the German armor on the southern flank.  The Germans were rated as good.

The Russians objective was to reach the western edge of the battlefield.   The Germans were tasked with halting the advance and if possible to drive the Russians back.
View of the battlefield from the north with Keith in the background.   A Russian T34/76 battalion with some infantry support is advancing on the left edge of the picture towards the PZIV company at the bottom left center.  The German infantry and mortars have occupied the town at center right.  The t34/85 battalion is advancing towards it.   At the top center Keith's T34/76 battalion and the infantry have occupied that town and the woods along the stream next to it. 


The T34/76 battalion and infantry advance along the northern road.

The first two turns saw both sides advancing towards each other.  The Russians moved first and using strategic movement had almost made it to the center of the battlefield by the first turn.   On the northern flank the PZIV company managed to defeat the opposing Russians with the loss of one platoon.    The southern Russian force dug in and halted their advance at the town.   They took up positions along the wood and town edge which exposed them to fire from the German armor.   This eventually led to their tanks being destroyed or routed by the Tigers and the PZIVs.   One PZIV platoon was driven from the field on that flank.   

The STUG platoon had shifted north and taken up hull down positions on the large hill just to the south of the center town (just above the center town in the top picture).   The T34/85 platoon knocked out the STUG platoon and one of the infantry platoons as it advanced on the center town.   The remaining infantry platoon's morale failed and it withdrew along the lead T34/85 platoon to advance through the town and overrun the mortars.  

The Germans reacted by shifting the northern PZIV company to positions along the western road northwest of the center town   At this point the game was called as a draw.   The Russian advance had been halted, but they had punched a hole through the center and almost made it to the western edge.  The Germans had lost their infantry and part of their armor.   Driving the Russian T34/85s out of the central town would be difficult,   The Russian infantry in the northern town would also be difficult to remove if they withdrew from the edges into the interior of the town.    


Unfortunately I was so busy as the game master that I forgot to take more pictures.   The top photo is courtesy of Mike O'Brian.


Tuesday, October 9, 2018

Nine Month Review of 2018 Projects

Back in January I posted a list of projects for this year.   The following is a copy of that posting and the status of those projects.

Projects for 2018

Time to set some goals for the coming year.  In no particular order I hope to accomplish the following items for the coming year:

Finish painting and basing 18th century armies (Duchy of Clove-Hamhock and Principality of Turanschlag).  I will need to purchase some additional Hussars and maybe some grenadiers and heavy cavalry from Heroics and Ros.   Got some new figures from a friend.  Partway done.   

Expand Franco-Prussian War armies.  Need quite a few additional figures from Heroics and Ros.  Fortunately they are easy to paint.  Changed to 2mm scale.   Being 3d printed over several months by fellow club member
Finish painting and basing additions to American Civil War armies.   Also print flags for them.  Almost finished painting them.  One of six unfinished items from last year.  Infantry finished

Finish painting and basing the Carthaginian figures I was given.  Not started

Finish painting and basing the barbarian infantry additions.   Not started

Finish painting and basing the early Byzantine cavalry,   Not started

Finish painting and basing the Sassanian cavalry.    Not started

Finish painting space ships.  About a dozen to paint.  Less than half a dozen to go.

Flock bases for Napoleonic armies along with any repairs that need to be done.  Most boring project.  Repairs part way completed.   Need to paint some additional figures and purchase a few more along with the 18th century figures from Heroics and Ros

Place a special order with GHQ for a couple of replacement tank gun barrels, a 5cm AT gun and crew, and a 7.5cm AT gun and crew for WW2 Germans.  WW2 done except for those items.  Done

Add helicopters to the two fictitious modern countries (The Peoples Democratic Republic of La Cucaracha and the Federal Union of Buena Vista). Already ordered and on their way.  Done

Choose a set of ancient naval rules for large fleet actions along with printing and basing ancient fleets.   Might be the most time consuming project when cutting and gluing them.  Done


At this point it looks like the ancients projects will not be started until next year.   Several additional projects happened during the year.    These include additional buildings, age of sail ships, and some additional spaceships added and painted.   Additional modern vehicles and infantry were painted and based.   Sci-Fi future tanks and IFVs.   Found that I will be needing some additional American and Russian WW2 tanks.   

Except for additional items to be purchased from Heroics and Ros, I hope to complete the ACW, 18th Century, and Napoleonics by the end of this year.  The modern forces are completed except for some new engineering vehicles that GHQ will be releasing next year.   

Monday, October 8, 2018

Battle of Ciudad Tiempo Pasado

The war between the Federal Union of Buena Vista and the Peoples Democratic Republic of  La Cucaracha continues.   This time the Buena Vista Presidential Guard Brigade and third Mountain Brigade were attacking two motorized brigades of the La Cucaracha army.   The Presidential Guard Brigade had two tank battalions and two mechanized infantry battalions in Puma IFVs.  The mountain brigade had three battalions in Boxer APCs.   The Cucaracha brigades had a tank battalion a BMP battalion and two BTR battalions.   Both sides had a divisional artillery brigade in support along with the brigade artillery battalions.  Rules used were Fistful of Tows 3.   The Buena vista brigades were rated as good and the La Cucaracha brigades were average.  Commanders on the La Cucaracha side were Jeff (Jefe) the overall commander, David on the left flank, and Brent on the right flank.    Greg was the overall Buena Vista commander and had the Presidential Guard brigade and Jesse commanded the mountain brigade.   Rick joined later and helped with the mountain brigade.  Objectives were for the Buena Vista army to punch a hole in the La Cucaracha defenses in order to get to the east edge of the table, while La Cucaracha had to prevent this.

Terrain is two foot rubber matts painted light tan with blue grey streams and model railroad ground foam.   Trees from ebay dealer on 50mm Litko hexes, foam core board hills, buildings by Paperterrain.   Vehicles are mostly GHQ with Heroics and Ros infantry.

 View of the battlefield from the south.   La Cucaracha forces are defending and have deployed in depth.   One motorized battalion is defending the city of Tiempo Padado  in the center of the battlefield another is deployed on the ridge and woods south of it and another is occupying the woods north of it.   Part of another infantry battalion is in the woods and hill further south with a bmp battalion near the woods east of the center ridge.   A tank battalion is just out of picture on the south edge.   The other BMP battalion is off of the north edge of the picture and the last tank battalion is in reserve near the top right of the picture. The Buena Vista mountain brigade advanced on a wide front with its three battalion in line.  One advanced towards the city and the other two were further north.  The Presidential Guard brigade swapped a tank company from each battalion with an infantry company from each of the Puma battalions. attacked in depth on the south side of the field.  The Buena Vista brigades both had three recon platoons, but only one was used on the first turn of the game on the south flank.  It was destroyed almost immediately when it advanced up the road on the south edge.   Recon units get an additional five hundred meters of spotting distance.   Due to cover provided by the towns, woods, and hills most units were not visible unless they were firing or moving and even then vehicles are only spotted at 2000 meters or less if they are in cover.

 Full view showing the tank battalion on the south end. and the north edge.
 View from behind the south flank of the Buena Vista army 
 View from behind the north flank of the Buena vista army.   The mountain brigade advanced cautiously initially.   About the fifth turn the left battalion made a dash for the town near the north center of the field taking heavy casualties.   
 The southern end of the battlefield.   Buena Vista Leopard 3A6 tanks have decimated the La Cucaracha T90 battalion
 The remaining T90s have been eliminated exposing the left flank of the La Cucaracha defenses.  The Buena Vista divisional artillery brigade and helped damage the defenders with its MRL barrages.   La Cucaracha artillery support had been intermittent throughout the battle due to poor communications (artillery request die rolls)
One of the Buena Vista mountain brigade battalions begins to assault the city.   Though taking some casualties from defensive fire, by standing off in the woods and concentrating fire from its infantry and APCs it was able to cause twice as many casualties as it took.

At this point we called the game.  We had started about 11:30 and ended at 4:30 with a 45 minute lunch break.   It was the seventh turn of ten.   We averaged about 30 minutes for each 12 minute game turn.  The game was declared a winning draw for the Buena Vista army.   While one of the mountain brigades battalions was in trouble the La Cucaracha left flank was in danger of being turned.   As long as the Buena Vista army could continue to engage the La Cucaracha infantry frontally and avoid being flanked they were likely to achieve their objective.   They had a four to three advantage in battalions, better quality (good vs average), and their armored vehicles were almost invulnerable to the infantry\s anti-tank missiles from the front.  The right flank motorized brigade would not be able to shift any support in time to the south and by doing so may have left an opening for the Buena Vista mountain brigade to create an opening in the La Cucaracha line.


Thursday, October 4, 2018

New additions.

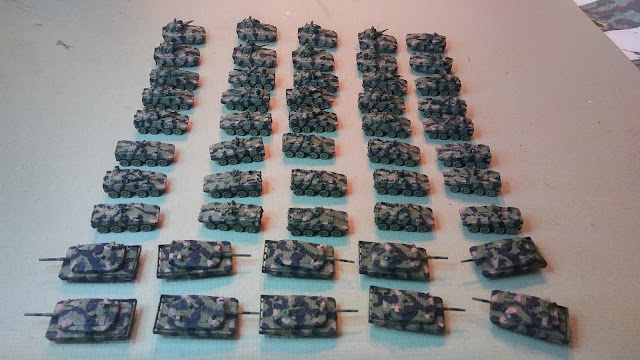
Since my last post I have not been able to do anything with wargaming except some internet browsing.   Things are back to normal now and yesterday I received some GHQ items I ordered.   Fortunately they arrived a day earlier than scheduled and I spent last evening gluing turrets onto the hulls.   Today I primed them with green spray primer and added the other two NATO camo colors.   I am also working on the Lace Wars figures that I have.  Getting them painted and based and determining what additional figures may be needed.   So far the only infantry that I am going to need are a couple of packs of grenadiers.    I may have enough cavalry.  The only uncertainty is the number of Hussars that I may need.


There are 10 Leopard 2 Revolutions, 10 Pumas, and 30 Boxers.  I was able to find painting diagrams for the Boxer and Puma by searching the internet and some help from people on The Miniatures Page.

T

Wednesday, September 12, 2018

2mm Franco Prussian War

I started painting the 2mm figures that my friend Gary is 3d printing for me.  I still have some way to go before I finish painting the first batch.   As an experiment I used a Paint Shop Pro to reduce an image of the Prussian battle flag to fit on the flags of one of the infantry strips.

After priming the strip with grey spray primer, I painted the ground around the base with camo green to match the artist mat board that I will be using for a base.  Next I painted the top part of the figures Prussian blue.   I could have added black to the top of the figures, but decided that the Prussian blue was dark enough for the helmets.   I did not try to paint the faces.   The last color was equine white for the flags followed by gluing the reduced battle flag to the figure strip.  I took the picture with my cell phone and it is a bit out of focus.  Next time I will use my camera's macro setting with better lighting for a clearer picture.

The Prussian battle flag is white with an eagle in the center.   From what I have read the Prussian infantry did not carry their flags into battle, but that is the way the figure strip is.   The two images below are the original image and the reduced image.   The original is actually 0.9 inches tall while the reduced image is 0.135 inches tall.   As can be seen the graphics program will keep the same amount of detail and resolution when reducing an image if the dots per inch is proportionally increased.  The only other limitation is the maximum dots per inch that the printer can produce.   Most current household printers can print high resolution photographs or other images.

Tuesday, September 4, 2018

Bloody Big Battles Return to Coulmiers

Fought the Battle off Courmiers this past weekend Gary hosted the game at The Launchpad game shop in Lodi.   I commanded the Bavarians again because George had to take care of some business items and arrived late.   I again deployed one of the commands in the village to the front in order to prevent the French from being able to start twelve inches in instead of starting from their edge of the table 


Bavarians deployed 

Except for his artillery George had better luck than Mike had in the previous game with his movement dice.  His artillery failed to move during the first turn and did not arrive until the second turn.  Throughout the game George did very well with his movement rolls for the cavalry and infantry.   His infantry advanced quickly and moved towards the main objective town that had two objective markers.


Turn 2.   Bavarian cavalry has advanced to counter the French cavalry on the right as the French infantry advances to the left.  All my formations near the town are out of ammo.


This time I withdrew my infantry from the forward position immediately and was able to get them into position next to the main objective town by the second turn.  My artillery fire over the first few turns disrupted several of George's infantry units slowing their advance in the center.   As his infantry approached he objective town devastating fire from my troops destroyed several of his infantry formations.  George was also able to bring some devastating fire against my infantry unit to the left of the town.   In the previous game this unit drove back attacks from at least four French units over the course of a couple of turns.   It was not the case this time as they broke and ran never to recover.  

Between George and myself we had three or four out of ammo rolls.  Out of ammo rolls happen when you roll 11 or 12 on the firing table.   You will cause a lot of casualties, but every unit that fired will be out of ammo until it does what is needed to recover.   Artillery does not fire for one phase and infantry must be out of small arms fire.   I did have to pull the infantry unit in the town back far enough to recover, but all the other units were able to recover almost immediately without having to move.   George was not as fortunate and had to pull several infantry formations back to recover.


One French unit has been destroyed in the center of the field while both sides firing has resulted in them being out of ammo (black markers).   My unit at the bottom center of the picture would soon rout.


On the left my infantry in the village was able to destroy the only French infantry unit advancing towards it.  I did pull that unit back on the fourth turn to keep it from being overrun by possible French re-enforcements that might arrive near it on turn five.  Both George and I failed to gain any re-enforcements when we rolled for them.


End of turn four.  More French infantry has been destroyed along with my formation that routed.   Both sides are trying to recover from out of ammo, while my infantry on the left has pulled back from the objective village.

On my right my two cavalry brigades had advanced to engage the French cavalry.   This resulted in a couple of turns of inconclusive results with both sides being disrupted, then recovering and charging into the other side while they were still disrupted.   This time no French infantry moved to intervene in the cavalry combat and I was finally able to roll high enough to rout the French cavalry and exploit forward.   On the following turn I moved one of my two cavalry brigades to the rear of the French army while the other moved to their left flank.   George attempted to halt the move by the cavalry to his rear with fire from his machine guns and an artillery unit, but rolled no effect.


End of turn five,  One of my cavalry brigades is now in the rear of the French on the edge of the table while the other is just out of the picture to the left flank of the French infantry at the top center. 


It was now the start of turn six.   Three French infantry units had been reduced to one stand or less along with the cavalry.   My left flank infantry was about to move back to the objective village on that side to prevent the French from occupying it.   My artillery and infantry at the objective town was currently out of ammo, but the French could not muster enough units to successfully attack it on that turn.   The French were also vulnerable to flank or rear attacks from my cavalry and were not likely to gain control of any objectives other than the main town that was worth two if my defensive fire was not able to halt any attacks on turn six or seven.   My artillery would have recovered from low ammo during my part of turn six and could still fire defensively if attacked on the French part of that turn.


At this point we called the game with French losses at 12000 infantry and 3000 cavalry to 4000 Bavarian infantry.   The Bavarians had been the last to pass through or hold seven of the objectives.   Other than the one infantry formation routing  and my cavalry exceeding what I had hoped for everything had gone to plan.

The previous battle can be found at  Courmiers


Tuesday, August 28, 2018

Leipzig Project Part IV

Completed the Swedish army except for Generals.    I still haven't decided on the basing of generals at this time.   This didn't take much time.   About an hour or two to repaint the grey or other colors of the figure bases and add ground foam.

Next will be the Austrians, followed by the Russians, and then the French.   I still need to order some figures for the Austrian cuirassiers and some Russian cavalry.   Though that will wait until I have determined what I need for the Seven Years War imagination armies.    That way I will only be placing one order with Heroics and Ros instead of multiple small orders.