Monday, September 1, 2014

Asculum at Pacificon

The second battle that I ran at Pacificon was Asculum.  The rules were Scutarii from Hoplite Research.  There were six new players for this battle and one who took part in Raphia.  The scenario was slightly modified from the original in the rule book.  The values for the Macedonian phalanx were changed to match the rest.  For this scenario all the phalanx formations are treated as double wide and double deep formations instead of two units by two units.  Also, the Italian and Mercenary infantry should probably have a defense value of 6 instead of 5.

Although this battle will fit on an eight food wide area for 40mm bases, it was fought on the same ten foot wide set of tables used for Raphia.  Once again the outcome of the battle would not reflect history.   At the start of the battle Pyrrhus shifted his guard cavalry and elephants to his left flank.  Neither army was able to gain an advantage in the cavalry combats on either flank until the elephants arrived and helped break the Roman right wing.

Mean while the infantry of both armies had advanced.   The Roman light infantry had moved ahead and began pelting the opposing infantry with their javelins.  They were able to get a couple of turns of missile fire before withdrawing behind their heavy infantry.  The Romans had moved obliquely towards their right while advancing.  The Pyrrhic battle line then advanced into contact with the Romans.   As the fighting in the center continued the Romans withdrew some of their exhausted Hastatii from the front line and replace them with the Princepes.   Part of their light infantry was sent to help support the flanking cavalry.  Much of the Italian infantry on Pyrrhus' left flank eventually fled, though enough remained to protect the left flank of the phalanx.  Both sides infantry had taken a beating, with one Hastatii unit in the Roman center at the breaking point.  The Roman's won the initiative and chose to have Pyrrhus move first.  Initial morale checks saw some of the pike formations break and with the rest likely to join the Romans won.   If the Roman's had moved first it is quite likely that part of their center would have routed, possibly causing other units to rout, causing a Roman defeat.   However, with the Greeks routing they would have received a morale bonus when they checked.

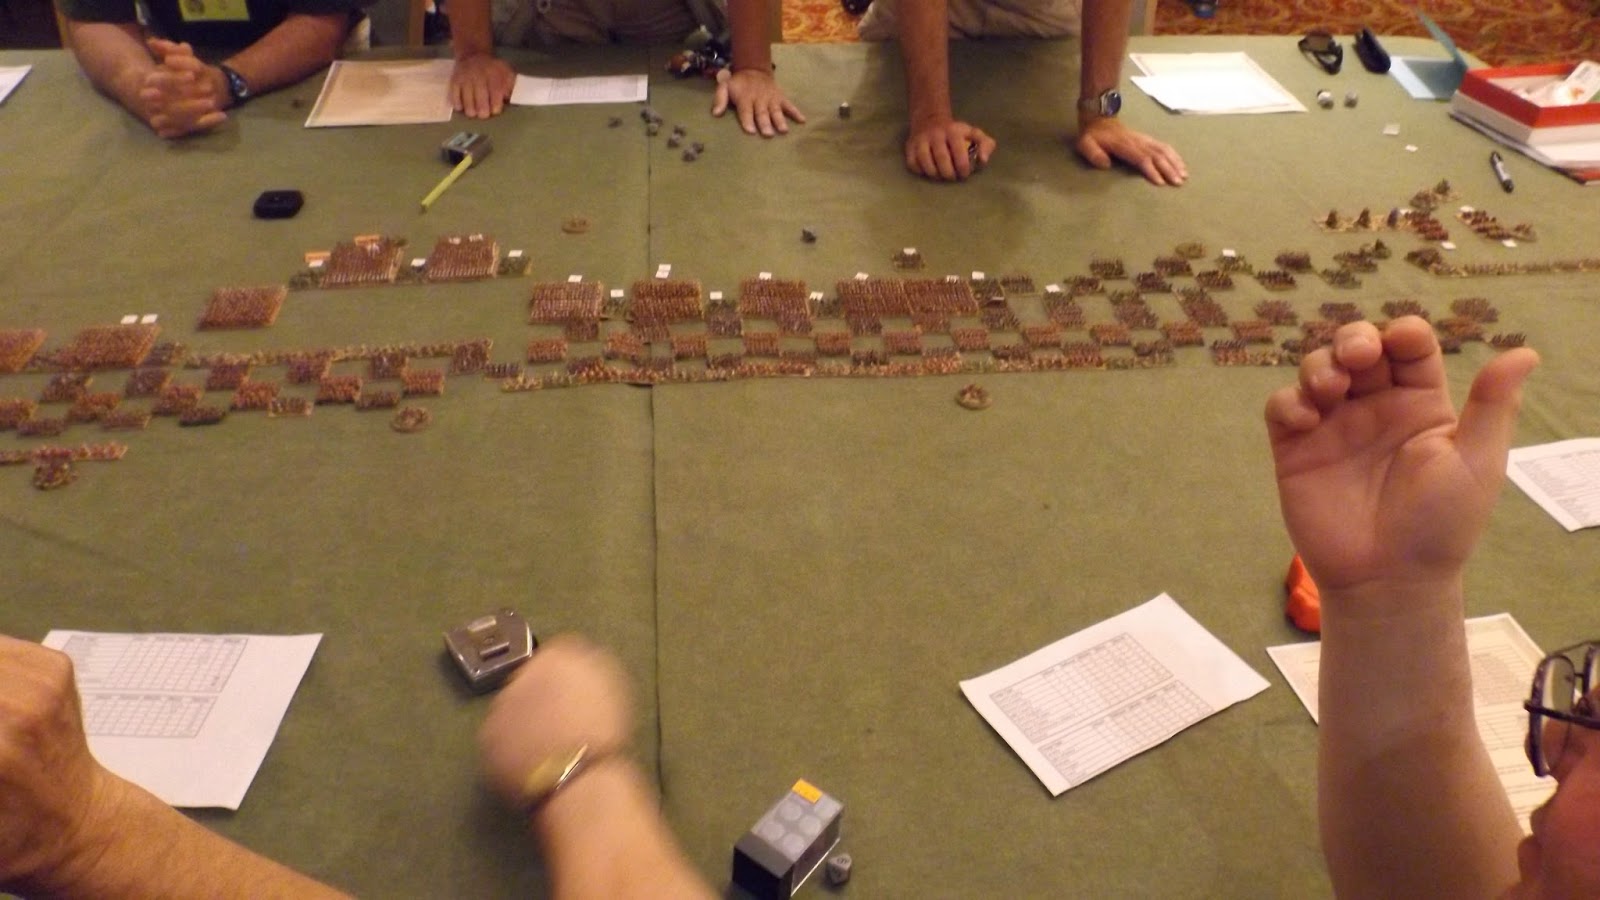
There are about 4500 figures for this battle.  They are a mixture of Rapier, Baccus, Irregular, and Heroics and Ros.  All the phalangites and almost all the Romans are from Rapier.  The battle started about 2 and finished about 5.  The following are pictures from the battle:

 Initial deployment from Pyrrhic right/Roman left.
View from opposite end.


 Start of battle.  Greeks on right Romans on left.
 Pyrrhus (Ix) contemplating the battlefield

The Roman commanders.
 Turn 2.  Roman light infantry annoying Pyrrhic infantry.
 Roman light infantry withdraws
The Greeks advance to contact
 

 Cavalry action on the Pyrrhic right/Roman left
 
Tarantine phalangites hold back.
 View of the middle of the battlefield from behind the Roman lines.
 Right wing Greek cavalry contacts Roman left wing cavalry.
 Right end of Pyrrhic infantry turns in on Roman left flank
 Most of the allied Italian infantry routs.
 Cavalry and elephants on the Roman right/Pyrrhic left
 
End of battle as phalanx starts to rout.

Raphia at Pacificon

Raphia was the first of two battles that I hosted at Pacificon.   The rules used were Scutarii from Hoplite Research.  There were six players who had never tried the rules before.   I would like to thank Mike O'Brien from the Miniature Wargaming Society of Sacramento who came by and assisted with running the game.  I was a bit concerned about this battle as there were over 150 units per side and all the players had not seen the rules before.  Each unit represented 500 men or 4 elephants.   Even though many of the infantry formations were deployed in depth the armies occupied almost ten feet (3 meters) of frontage using 40mm bases.  It probably would have been better to have another 2 1/2 foot wide table added to this.  Ten feet is slightly over 4.5km wide.  Another 2 1/2 feet would increase this to just over 5.6 km.   There were 5000 figures used for this battle with about 4000 of them being phalangites.  The figures are a mixture of Rapier, Baccus, Irregular, and Heroics and Ros.   All the phalangites are from Rapier.  The Arabs and Asiatics are from Baccus.  Thracians, Gauls, and Lydians from H&R.  Elephants and cavalry from all four.

Polybius is the main source for this battle, providing detailed numbers and dispositions for both armies.  The Seleucid army had 62,000 infantry, 6000 cavalry, and 102 elephants.  Ptolemy had 70,000 infantry, 5000 cavalry, and 73 elephants.   There were 35,000 phalangites in the Seleucid army and 61,000 in Ptolemy's army for a total of 96,000 phalangites.   The point an combat values for both armies are as below:

Unit TypeAttack DefenseMoraleCostPtolemySelecucid
Guard Cavalry5511111144
Settler Cavalry4510105080
Mercenary Cavalry351110400
Guard/Mercenary Phalanx36119234270
Macedonian/Settler Phalanx36108448320
Egyptian Phalanx36972800
Arab/Asiatic Infantry35950200
Thracians/Galatians/Lydians351178428
Indian Elephants4610130325
African Elephants3610122160
13631267

Historically, the right wing cavalry of both armies defeated the opposing left wing.  Ptolemy left his guard cavalry and moved to the infantry center.  Anticochus pursued the opposing cavalry instead of turning on their center.  Ptolemy's right wing cavalry did not pursue and turned on the left wing of the Seleucid infantry causing them to flee, this caused all the other Seleucid infantry to rout.  The infantry of both armies had held back from contacting the opposing infantry.

The re-fight was to take a slightly different path.   The Seleucid right wing defeated their opponents and instead of pursing halted and reformed.   Ptolemy had moved to the infantry.   On the other wing, Ptolemy's cavalry directly engaged their opposing numbers instead of attempting to skirmish and out flank them.  This would result in a drawn out struggle that eventually saw the Seleucid cavalry triumph on the left flank.

In the center both of the infantry lines had held back.  Ptolemy's infantry advanced to engage the opposing infantry.  The fighting was intense.   Part of the left end of the Seleucid infantry broke and fled, but the rest held   Eventually part of the Egyptian phalanx broke, the resulting morale checks caused more units to rout.  At this point the players on the Ptolemaic side conceded as it was quite likely that most of the rest of the army would fail their morale checks for friends routing and join them.

The following is the basic turn procedure for Scutarii.   Both sides dice for initiative with the higher score determining who moves first during a turn.  Any troops for the moving side that have to check morale do so before any units are moved.  Troops that have missile weapons may use them at any point during their movement and continue to move if they still have movement left.   After a side has completed moving, any opposing units in contact will resolve hand-to-hand combat.  Units roll a number of dice based on their attack factor, taking into account any modifiers, and must score higher than their opponent's defense value to cause a hit.   Hits are cumulative and are not removed.    These will cause a unit's morale to decline and represent fatigue, casualties, and loss of fighting spirit.

The following pictures are from the battle.  Unfortunately, I had left the container with the hit markers at home and had to resort to some sticky labels to keep track of the hits.   Fortunately Mike O'Brin found some blank counters at one of the dealers and these were used to replace the sticky labels.   The battle started just after 9 and finished shortly after noon.


 Start of battle as viewed from Ptolemy's right/Seleucid left.
 Seleucid cavalry advance.  Bob Burke commanding left flank of Seleucid army.  Ed Gonsalves commanding Ptolemaic center.
 The elephants and cavalry engage in combat on that flank.
 Cavalry and elephants on the other flank
 Combat continues on Bob's flank
 view of the center of the battle from behind the Ptolemaic lines
 Cavalry and elephant action continues on Bob's flank
 view from behind the Seleucid lines

 Antiochus defeats the opposing cavalry and prepares to move on Ptolemy's infantry flank.

End of the battle as Ptolemy's phalanx starts to collapse


Pacificon

As usual, Pacificon had a wide variety of games.  Role playing, boardgames, miniatures, etc.   It looked like there were fewer dealers than at Kublacon.    The following pictures are from the various games and dealer area in the main ball room at the hotel.   The role playing games were in another section of the hotel.

 The dealer area
 Nick Sterns huge 54mm game
 Memoir 44 Normandy invasion
 Aircraft take to the skies
 WW1 action

 The other airplane combat
 Pirates! game
 Sci-Fi combat
 Board game area
 another view of the Pirates! game
ww2 action setting up
 Pirates!  game master in costume
 Steve Montgomery's ww2 infantry skirmish game
 The large Memoir44 Normandy game