Wednesday, November 22, 2017

German Attack on Stalingrad

This past weekend Manny Granillo, owner of Hoplite Research, hosted a game of PanzerKorps.  I had the role of Paulus, the German Commander.  Scott Wilson had the 29th motorized division, Rick Pullin had the 94th infantry division, John Arena. had the 24th Panzer division, and I had direct control of the 71st infantry division.   John Cunningham., his son Aydin, and Alan Sissenwein commanded the Russians.  Our objectives were to either capture and hold five of the central building/factory areas or to completely demoralize the Russian army.
Some views of the battlefield

Clicking on the pictures will enlarge them.

View from the north

View from the east

The south edge of the battle from behind the Russian lines.

South end of battlefield from behind German lines.  29th motorized at top right, 94th infantry at right center, 24th panzer west of the river

view of the city  We had to capture the building in the center, the two on both sides of the dice tray, a factory at the top left of the picture and another factory just to the bottom of the picture.
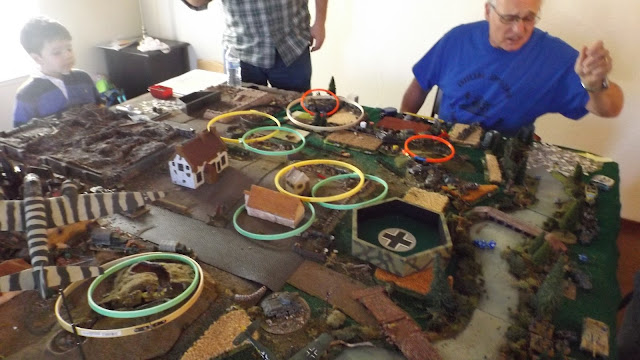
The plan that I conveyed to our army was to spend the first two hour day segment bombarding the Russians and then advance on them.  The 24th Panzer was to hit the hill in front of the south center of the front of the town with two battalions and the built up area to its south with its other two battalions.  94th was to also divide its four battalions into pairs and continue along the front edge of the Russian defenses from the 24th's bombardment.  The 29th was to continue the bombardment from there with its three battalions.   Meanwhile my four battalions fell on the forward positions of the Russians at the north edge of our front.  Our aircraft also came in and bombed the hill and town areas that the 24th was shelling.


Artillery bombardment rings.  The red and white at the top are Russian artillery landing on the 29th and 94th.  The other rings are ours attacking the hill at lower left and the city.  A total of 11 battalions.

My artillery was able to rout the Russians from their forward positions.  On the other end our artillery was not able to cause as many casualties.  I should note here that Alan, who was commanding the Russians facing me, had bad luck with his die rolls throughout the game, rolling a lot of 1's.  PanzerKorps uses D4, D6, D8, D10, and D12 dice depending on the quality, condition, and type of troops.

The Russians on the south end of their front came out of their fortifications and attacked the 29th motorized division after shelling them with their artillery.   The Russians only had five battalions of artillery to our 15, though they did have a river flotilla in the Volga which ran along the east edge of the battlefield, with additional guns.  These could only be used in line of sight.  The 29th was able to prevail in the hand to hand combat that occurred, though it did have a few battalions bloodied.

bombers attack hill and town.
Scott assesses the situation on his flank as his division engages in hand-to-hand combat with the Russians.  Orange ring is Russian artillery falling on lead elements of the 94th infantry division.

The Russians had two armored brigades in reserve near the center of the city.  One of these was dispatched to aid the southeast and the other was sent to the northern flank.

Routed Russian infantry regiment at left center of picture, arriving tank brigade in town.
My left flank regiment advances

We broke for lunch after the end of the first day segment.  After lunch we returned to the game for the next two hour day segment.

In the south the 94th continued its advance into the city, while the 29th continued to combat more Russians.  In the center the 24th Panzer shifted its four artillery battalions north to attack the center of the Russian front line.  One Kamfgruppe with the Panzers advanced across the river on the road leading to that location while the other Kampgruppe with the STGIIIs advanced along the road in the south center.   The STGs came under fire from the southern Russian armor brigade, but were able to deploy and returned fire.   The panzers were not as fortunate.  they came under fire from the infantry positions in front of them and rolled a one, causing them to take casualties and fall back across the river.  In my area my two lead regiments were advancing with the one on the left making good progress and the one on the right starting to cross the river.  The one on the right had been bombarded by the Russian artillery during the first day segment and now came under more artillery fire as it attempted to get across the bridge.  One battalion made it across, but the others were halted.  The Russians also shifted an additional two battalions of artillery fire from their southern front to the north.  While the regiment on my right was being attacked by two of them, the other two bombarded my regiment on the left.   As a result of the artillery fire three of my battalions in the two regiments had taken some losses.

I now shifted my artillery fire further east to bring the Russian tank brigade, the retreating battalions of their front regiment, and an infantry battalion in the northwest corner under fire.  Again, my artillery fire was effective as Alan's defense die rolled another one.   The three battalions of the forward regiment were destroyed as the survivors scattered.   The tank brigade and the infantry in the corner position both broke and fled..


Russian tank brigade and infantry defending corner have fled.  Four battalions of the 24th panzer artillery attacking the center edge of the town.  While Russian fire falls on bridge to right blocking my advance and heavier guns at the bottom are landing on the rear battalions of my left flank regiment.

24th panzer PzIII battalion crosses the bridge.

Another view of the panzer battalion

The burning hulk of the lead panzer.

At the end of the second day segment we ran out of time and the game was halted.   Although we had taken some losses, our attack on the city was on schedule as the first positions had been taken as planned.  I had forgotten about the rule for free moves when rolling for command initiative.   If I had remembered it, the high rolls I had been making on initiative ( I had rolled a six three times during the five turns of the two day segments), my right regiment would have been across the river, and my left regiment would have been further forward.   I would have also been able to bring on my third regiment and supporting battalions.

Thanks to Manny for hosting the game and feeding us.

Tuesday, November 21, 2017

Shadow Omega

Received this in the mail on Monday.  Clicking on a phot will enlarge it.
 Top View
 Front View
 Rear View
3/4 view from rear.

The model is from Pulsefired on Shapeways.  It is 134mm (5 inches) long.  This is to big to fit in with the other ships.  Hopefully he will be able to produce a smaller version that is to scale with the other Domain ships that I have.  The ship is from the old TV series Babylon 5 and appeared during the fourth season.  While it is often referred to as the Shadow Omega, due to combining Shadow Technology with the Earth Alliance Omega it was known as the advanced Omega.  The spines sticking out  from it are found on the Shadow ships which look sort of like a flattened spider with the legs (spines) all sticking out.  I haven't counted how many spines it has.  It is also a very good model of the ship.

The balance point is just in front of the rear ring of the central rotating section.

Thursday, November 16, 2017

Sensor Drones and Misssiles in Starcruiser 2300AD

Most of the space fleets in Starcruiser have sensor drones.  These can be used both offensively and defensively.   They can be sent out ahead of the fleet in order to use their passive and active sensors to detect opposing ships, etc.  When their active sensors are emitting they can also be used to help screen ships from being detected.  Active sensors add the equivalent of four light seconds of distance to the detection range of opposing sensor detection attempts if they are with a friendly ship(s) or directly between the opposing sensor and the friendly ships. 

Sensor drones could also be used as a decoy.  If they are designed and equipped with additional reflective surfaces or fixtures they can made to appear as a full size ship to active sensors.  Also, if strong enough, their radiated signature may appear to be the same as a regular ship.

As I noted in a previous post, I re-designed the missiles to increase their velocity.  I only did this with the French, German, and American missiles as these are the ones being used by the main combatants in Human Space.   Those used by the Kaefers only had their velocity increased instead of being completely re-designed.   As far as I know design information for the Kaefer's has never been released, though there has been some additional in later books. 

The following tables have the revised statistics for the American (Federation) SIM-14, French (Panthari Imperium)Ritage 2,  and the German (Domain) SR-10, and Donnerwetter missiles.  The formula for the volume of a missile bay is (diameter)x(length)x2x(number of missiles per bay)meters cubed  The surface area of the exit port for a missile is (diameterx2)meters squared.  All missiles are considered to be cylinders.

Design parameters
Missile Sensor Attack Power Plant Drive Cost
Federation 20p 10x2 0.5FC/NM 0.5NM 2.0mcd
Panthari 10P 10x2 0.5FC/NM 0.5NM 2.0mcd
Domain 1P 4x3 0.5FC/NM 0.5NM 1.8mcd
Domain exp. 6P 10x3 0.6FC/NM 0.6NM 2.4mcd
Sensors are passive.  FC is fuel cell.  NM is new military.  mcd is million credits.  costs were rounded up slightly to account for hull material and fuel.  Cost per missile is about four to five times that of the original designs.

Dimensions and velocity
Missile Diameter Length Volume Mass Velocity  Duration
Federation 2m 2.75m 5.5mc 7.84t 14 80min
Panthari 2m 2.75m 5.5mc 7.84t 14 80min
Domain 2m 2.5m 5.0mc 7.04t 14 80min
Domain exp. 2m 3.4m 6.8mc 9.42t 14 80min
Volume is meters cubed.  Note: The Domain missile can have a velocity of 15 by replacing the power plant and drive with 0.6mw units and increasing the length to 5.5m  this would also increase the volume of the missile bays.  Cost would increase to 2 million credits

Bays
Missile Bay Volume # per Bay
Federation 55mc 5
Panthari 44mc 4
Domain 120mc 12
Domain exp. 163.2mc 12


Wednesday, November 15, 2017

Ships of the Panthari Imperium

Took the following pictures of the ships that I am using for the Panthari Imperium.  These are from Irrational Designs on Shapeways.
 Battleships
 Cruisers
 The fleet.  Two battleships, four cruisers, and four frigates

These were the closest designs that I could find on shapeways to the following ship from the 2320 version of 2300AD


Monday, November 13, 2017

When Worlds Collide

There are quite a  few pages on Shapeways that have planet and sun models.   Some can be quite expensive.   3Danime and LittlePlanetFactory make them in various sizes and prices.  There is another page that has fictional terrestrial planets..   The following picture has the ones that I purchased.
From left to right and front to back.   Terrestrial world, gas ball or ocean world, striped gas ball, what is supposed to be the sun, but is actually more red than the picture shows and would pass as a red dwarf, an arid planet, and a dead planet.  These are all about one inch or less in diameter.  I plan to get a four inch diameter plastic or foam ball from an arts and craft store to make the correct size model of our sun which is just over four light seconds in diameter.

Friday, November 10, 2017

2300AD Kaefer space ships

While browsing through shapeways looking for some space ships that would be useable for the marauding aliens in the Human Space Universe (use the label to see earlier posts and background)  I typed in 2300AD and Kaefer and found three  ships at
https://www.shapeways.com/shops/magnificent-obsession 
These were the Kaefer Alpha battleship and Beta battle cruiser and the French Suffren.    The French chip was very close to the images from the game and 2300AD books, while the Kaefers had some differences.  I decided to purchase several of the Alphas and Betas.   Price will vary depending on the type of material chosen.  The two are shown below
Alpha
 alpha front
 alpha rear
 Beta front
 beta rear
 beta top.
Beta (top) and Alpha (bottom)

The pictures were taken outdoors in the sunlight and some of the detail on the left side of the p0hotos of the models is lost in the glare.  The ships do not come with a mounting hole which I added with a 1/16 inch drill bit (about 1.5mm) after finding the balance point.   The beta has a slightly flattened oval front while the alpha is round.   Both are nicely done and scale well with the ships I am using for The Domain and The Federation

The betas sort of conjure up the image of a wasp or scorpion with their gun towers located at the rear. and will be painted in a yellow and black pattern similar to wasps and bees.  The alphas will be painted in various stripes or spotted predator patterns.  The fronts of both will be painted with fangs similar to some aircraft for the alphas or like venomous snakes for the betas.


Sunday, September 10, 2017

The Battle of Trebia at Pacificon 2017

Trebia was the first of two games that I ran at Pacificon.   I had originally scheduled the game to run from 10:00 AM until 2:00 PM.  However, two additional ancients games were added to the schedule with the first starting at noon.  Because of this I changed the times from 9:00 until noon.   There were six people who participated in the game.  Considering all the games that were being run that morning this was a good number of players.   The table measured 6 feet by 10 feet.

The armies were as follows:
ROME
UNIT ATT DEF MOVE MISSILE MORALE POINTS NUMBER TOTAL
GENERALS +1 X 14 X + OR - 1 OR 0 X 1+8 X
VELITES 3 5 6,8 2" 10 7 20 140
HASTATI 3+2 6 6 X 10 9 20 180
PRINCEPES 3+2 6 6 X 10 9 20 180
TRIARII 4 6 6 X 10 9 20 180
CAVALRY 3 6 12,14 2" 10 10 8 80
760
CARTHAGE
UNIT ATT DEF MOVE MISSILE MORALE POINTS NUMBER TOTAL
HANNIBAL +1 X 14 X + OR - 2,1,OR 0 10 1 10
GENERALS +1 X 14 X + OR - 1 OR 0 X 8 X
SLINGERS 2 5 6,8 2" 11 8 1 8
LT INF 3 5 6,8 2" 11 8 15 120
AFRICAN INF. 4 6 6 X 11 10 16 160
SPANISH INF. 3 5 6 X 11 8 8 64
GALLIC INF. 3 5 6 X 10 6 18 108
NUMIDIAN CAV. 3 5 12,14 2" 11 9 8 72
SPANISH HORSE 3 6 12,14 2" 11 10 4 40
GALLIC HORSE 3 6 12,14 2" 10 9 10 90
ELEPHANT 4 6 8 X 10 11 8 88
760
Surprisingly both armies had equal points.   There was a special rule that I thought of including for the game to reflect the Romans crossing the cold water of the river and not having time for their morning meal.   This was to have the players roll one die for each unit with an odd numbered result causing the unit to start the battle with one hit.  Since this was a convention game and meant to be fun for all, I decided not to use this.

The Romans were given the option of how many of their eight cavalry units they would deploy on each flank with some restrictions.   They were required to place two on each flank with the remaining four as they chose.   They elected to have four cavalry units on each flank.  The Carthaginians deployed all their Gallic cavalry on their left flank, all the Numidian cavalry on their right, and sent all the Spanish cavalry on an off table flanking move.

Initial deployment.  Romans on right. Carthage on left

View from the opposite end
View from Carthage side.  Spanish infantry on right African infantry in the middle, Gauls on left, skirmishers in front.
Behind Roman lines.  Two combined Consular armies in standard Roman deployment
Carthage had an overwhelming advantage on both flanks with the elephants and cavalry outnumbering the opposing Roman horse, but their infantry was outnumbered by the Roman infantry facing them. 

Carthaginian commanders.  Steve (Hannibal) at the front and his son Matt at the back..

Roman commanders.
By turn two both armies were engaged in combat.  Instead of using their elephants to disrupt and chase off the Roman cavalry and then turning in on the Roman infantry with their cavalry the elephants ended up fighting the Roman infantry and the cavalry became tied down fighting the opposing horse. 

Turn one

On turn three the Spanish cavalry arrived on the Roman left flank behind the Roman lines.   With their flanks in jeopardy the Romans shifted their velites to protect the flanks of the heavier infantry.

Turn 3 Carthaginian flanking force has arrived and ridden into the rear of the Roman left.
Other end of the battlefield.  Roman cavalry has fallen back evading contact

Eventually the Roman infantry were able to cut their way through the opposing infantry center.   At this point Carthage conceded and the game was called at 12:06 PM.   Actual play had started after 9:00 following an explanation of the game mechanics.

 Fighting continues as casualties increase along the line
Gauls are held up
 Velites shift to protect flanks of the main battle line
Right end of Carthage infantry routs.  Soon to be followed by the rest of the infantry.

The Roman army is all Rapier Miniatures figures and is just over 2000 figures.  The Carthaginians are mix of Irregular, Baccus, H&R, and Rapier. and is also about 2000 figures.